Ray Harryhausen Awards 2024 - Best Children's Animation WIN
I am delighted that films directed and co-created by me, Emma Dougherty, founder of StopMoGo, won Ray Harryhausen Awards for Best Children’s Animation 2024.
I also designed the concept, storyboard, puppets, and props and directed the film at a surprise bespoke birthday workshop I created for a young animator whose film won an honourable mention in the 2024 Awards.
As with all of my workshops, a great deal of work happens behind the scenes. This post shows how my inspirations, puppets, props, sets, sound, and film-making techniques went into making the winning animations in my Edinburgh studio.
A Bit of Background
How did this all come about?
In addition to creating my own films, I have been inspiring and helping people to make high-quality stop motion animations ever since I set up StopMoGo in 2010.
What makes my workshops different is the amount of creative input from me. It goes far beyond supervising participants with a lump of plasticine. I create immersive stop motion workshop worlds, each with fully realised stories and engaging activities that develop different animation skills and techniques. Participants can step into these immersive worlds and bring them to life.
To date, I have created twenty-six different themed workshop worlds, each with activities, puppets and props which I hand-make and place in participants’ hands. Actually, it is now twenty-seven if I include my immersive six-room installation, Animating Wonderland.
Ray Harryhausen's Influence
The work of Ray Harryhausen has had a profound influence on me. It is undoubtedly one of the defining reasons I have been devoted to stop motion. I will never forget the first time I saw Clash of the Titans, enthralled by Pegasus and terrified by Medusa. I spent at least 6 hours at the ‘Titan of Cinema’ exhibition at National Galleries Scotland, marvelling at his creations.
Myths and Legends
When I was a teacher, ‘Myths and Legends’ was one of favourite topics to teach. When I left my job as a teacher to pursue my passion for stop motion, it was one of the first themes I chose for my immersive stop motion workshops.
Here is artwork I created featuring my two StopMoGo mascots, Pip & Pogo, for my ‘Myths and Legends’ poster.
I suggested we could make animations to enter into the Harryhausen Awards to a couple of children who had attended a few of my previous workshops. They had booked another six-week course with me, and it seemed like a good opportunity, especially as I had recently met Vanessa Harryhausen and learnt more about the awards.
I chose ‘Myths and Legends’ as a theme to build on my previous immersive workshop and all of the puppets, props, and activities I had created for it. Also, the children had not heard of Ray Harryhausen, so it was a way to introduce his work.
Which monsters to make?
I provided a range of my teaching books on mythical creatures and we watched various videos showing Ray Harryhausen’s creations for inspiration.
Title Sequences
Whilst they were thinking about stories, I introduced the children to an activity that I first created for my after school clubs, it uses plasticine shaped into your name for a title sequence. I came up with the idea to teach the power of using playback in reverse. You can find full instructions on how to create the title sequence, together with lots of my other activities, in my on-demand 3D stop motion course.
Later, when I was editing the children’s films in post-production to improve timing etc, I re-coloured the plasticine to match the rest of the titles and end credits I also added to the films.
Model Making
Creating Monsters
To enable the children to have as much time as possible to animate at the classes, 2 hours a week over the course of 6 weeks, I created armatures, eyes, and prepared plasticine for the puppets in advance.
Giant Serpent
Here is the simple armature I made for the giant snake from aluminium wire from Animation Toolkit, a polystyrene egg I trimmed down, and masking tape. The reason I covered the wire with tape was to help the plasticine stick to it.
I made eyes from balls of yellow polymer clay with an indent in centre before baking, as the hole allows you to use a pointed tool to animate the eyes moving. I then painted the pupil with black enamel.
It was then covered in two tones of green by the child, with texture created by modelling tools.
Cyclops
This was a bit more complex. I had never made anything approaching a cyclops puppet before.
As it would have taken the children several classes to make the armature alone (and not left much time to animate), I helped by doing a lot of the preparation in between classes.
I first created a wire armature. I looked at the design of Ray Harryhausen’s Cyclops for inspiration.
I then used Milliput, a two-part epoxy, to create structure and bones. I usually use superfine, but did not have any to hand, so used the standard one. It is important to make sure that the Milliput is well mixed.
One of the trickiest things was designing the armature so that the top body was large and muscular whilst also ensuring it would stand up by itself and not topple over. It took some effort to find the centre of balance (and modelling quite a big backside!). I also added a neodymim magnet to the bottom of each foot before the Milliput dried, as I would be putting a magnetic board underneath the set. This would also help the puppet stay upright.
To help the plasticine stick, I wrapped the armature in surgical tape which is softer and better than masking tape for more complex shapes.
I made the eye from Fimo, painted the pupil with black enamel, making a hole before baking so that it could be animated looking in different directions.
I showed how Aardman include large brows to their characters so that they can convey emotion. We talked about how you can make a character look angry, surprised, scared etc. Also, how eyelids and blinks can bring a character to life and express emotions. These things are especially important if a character does not talk, such as Gromit.
I gave a 1:1 model-making masterclass, showing how to use tools to add hair-like texture to the legs, definition to the muscles.
I always encourage children to go bigger with their characters, to exaggerate features as it will look better on screen. With the cyclops, I suggested big ears, horn, nose, lips, hands.
I created large hooves in the armature so that it would help the puppet stand up. I suggested making the teeth from something other than white plasticine as this would get squished when animated. I searched about my studio for something suitable, and went with small pieces of white foam.
After the sessions were finished, I repurposed my armature to create another cyclops puppet. Below, you can see how I made and then animated it.
In addition to my articulated figures, I also gave the children the use of props I had created for my original ‘Myths and Legends’ workshops.
I had first made the helmets, swords and shields for an activity recreating the scene with Medusa in ‘Clash of the Titans’. Below are some of the animations made by children animating the activities and props I designed for my ‘Myths and Legends’ workshops. You can also see more about my creations on my Facebook and Instagram pages.
Replacement Technique
Anyone who has ever been to one of my workshops will know how much I love to use the replacement technique in stop motion animation.
The reasons I love it so much, especially for use at workshops, are that, whilst the initial creation of the replacements takes time, especially with these Pegasuses (Pegasi?) – they took me a lot of cutting out, animating them is relatively quick and can produce excellent results.
I gave the children the use of my Pegasus replacements that I originally created for an activity at my Myths and Legends workshop, an ode to Ray Harryhausen’s remarkable model and animation in ‘Clash of the Titans’.
Something I have always worked hard on when creating activities for my stop motion animation workshops and courses, is devising engaging ways to instil the 12 Principles of Animation.
Staging
With staging, it is all about thinking of your stop motion set as a miniature theatre stage. Can the audience see what is happening? Are you focussing our attention on the most important thing that is happening? How can you create shots that makes us feel what is happening? How can you position your characters, their eyes to do this? More on the techniques and ideas I shared for their films to improve staging below.
Anticipation
Anticipation is important when creating engaging films. So, when it came to the moment that they were either cutting head off snake or stabbing the cyclops, it was a great moment to teach this animation principle. I encouraged the children to think about how they would swing a bat to hit a ball, advising that they raise the sword up for several frames with a very slight pause, before bringing it down in a swift motion.
This is a clip from an animation I created for my summer workshops that demonstrated the use of anticipation.
Here you can see this in the child’s animation – raising the sword up, a slight pause, before bringing it down. I extended this pause when editing the animations.
I suggest larger movements on the way down to take gravity into account and to make it more dramatic.
Filming-Making Techniques
Establishing Shot
To introduce the audience to the location, position the camera so that it takes in the whole scene.
Focus Pulling
To make this above shot more interesting, I cut out some blades of grass for the child and showed how they can be used to add depth, especially with a focus pull.
First, focussing the camera on the grass, then adjusting the focus frame by frame onto the subject, as I did in my Tatty Devine animation below (watch in full here).
I chose black card as the scene was set at dusk and it would make it look like the grass is in silhouette.
Here it is a focus pull in the child’s animation:
Extreme Close-Up
At the other end of the scale, I suggested moving the camera for a extreme close-up is effective for moments, such as when the cyclops gets stabbed.
Scrolling Background
This technique is used a lot in classic cartoons. It is really effective and easy to do in stop motion. Your character stays in the centre and all you need to do is move the clouds. I suggested to outline the clouds in black pen so that they would stand out and have a more cartoon look.
By positioning the camera so that you cannot see the toy horse’s legs, it gives the impression that Pegasus is flying.
I stuck on wings from another of my puppets using a glue gun, which is a method I have used a fair bit as it is easily to peel off afterwards.
POV shot
You can make the audience feel like they are part of the films with shots from the point of view of the character – we see and feel what they do.
I suggested that the children include POV shots for the important moments when their hero faces the monster.
With a close-up of the protagonist first, showing them shaking their head, raising their hands to their face, or showing fear in some other way. This establishes that what we see next is from their point of view.
Using colour enhances the emotions the character is feeling. This orange background with jagged red and black lines adds to the sense of menace.
The Hollywood Backdrop
In the way classic films such as The Wizard of Oz used painted backdrops, I suggested we could use this as a simple technique to create depth with forced perspective. The background sheets in the children’s films are all ones I created for my Myths and Legends workshops. This dungeon one is especially effective with the way we positioned the camera and had the character walking towards it.
Match Cut
As the character was travelling to several different locations, I suggested the use of a match cut. I showed how I had used one in my Pirates animation to transition between the pirate in the captain’s cabin to him on the plank (watch my animation in full here).
The way I animated my pirate looking around was my homage to one of my favourite directors, Steven Spielberg – inspired by this cut in ‘Indiana Jones and the Last Crusade’.
Here is where this technique was used in the child’s animation to transition between locations.
Tilting Shot
I suggested this technique for revealing the monster as it would help the audience share the protagonist’s fear.
I showed them the transformation scene from ‘Wallace & Gromit: The Curse of the Were-Rabbit’ as it features a tilting shot, starting from the group upwards, to gradually reveal the monster, building the audience’s excitement and anticipation.
This is how I directed the scene in the child’s film:
First, an establishing shot, where the hero looks up at something off-screen, noticing it. He steps backwards in initial surprise/fear. This creates excitement in the audience. What is he looking at? It must be something scary!
Then a close-up so that the audience can connect with the character. He raises his sword in preparation. This builds even more anticipation. We do not want to reveal the monster straight away.
Now the tilting shot, revealing the monster.
Then, back to the hero. Raising his sword to show he is resolute to attack the monster.
Taking it to the Next Level
All of the techniques I have mentioned above will take your films to the next level. Great films tell stories and immerse you in their world. They make you FEEL.
In the section on model making I spoke about how I helped the children with character designs, and why certain decisions were made, i.e. encouraging them to think about how they were going to use eyes, brows, and eyelids to express the character’s emotions.
Here you can see the various moments in their films that I suggested shots, what to animate, and how to improve scenes with additional moments.
How to add more drama and make us connect with your character
With the cyclops, to make the scene more dramatic, I suggested a close-up where he frowns, looks down into the camera, gesturing with his hand as if daring you to ‘come on then’, with blinks and blood dripping. You can see this in my cyclops animation above. This really adds to the menace!
You will notice the benefit of my intervention in the child’s animation below when the cyclops looks down towards the camera.
Something I often remind children at my workshops to do is making their puppet look at us, the audience or towards their other puppet ‘on stage’, as it helps us to connect with their character.
Before the monsters were dispatched, I suggested a close-up shot, showing their eyes widening, brows raising in fear and surprise.
Extra Sprinkles of Fun
To add some additional appeal, drama and fun into the films, I suggested a moment when people run away from the monstrous snake in terror and towards us shaking their heads and arms. I showed the children the iconic moment from ‘Home Alone’ and suggested trying to animate it in the same way.
Another retro reference was the opening clip of a cartoon from my childhood, He-Man and Masters of the Universe. I suggested using a whiteboard to animate the magical power emanating from the heroine’s sword.
For another injection of fun, I suggested creating some ‘outtakes’ or bloopers similar to those created in Pixar movies. For example, the ‘actors’ relaxing after filming the movie, sitting on a chair chatting, eating or drinking etc.
This is one of the children’s ‘outtakes’, a hamster, noshing away on his lunch. I donated some of my afternoon snack, sunflower seeds, and suggested how to make it look like the cheeks were filling by adding increments of clay.
The Magic of Stop Motion
As anything is possible with animation, I showed how to use the magic of stop motion for the moment the character puts the dragon’s head in a bag. I made replacement bags from plasticine and silver thread. I suggested that the character reaches behind his back to make it look like he is getting the bag out. Then, to start with the smallest bag and swapping it for the larger one to show that the dragon’s head has gone into it.
As we could not see what was happening very well, and as a reminder of importance of staging, I suggested tilting the camera down as he animated the head going into the bag. Using my one of favourite sound effects, ‘flop’, is the finishing touch to this moment.
Sound Effects and Music
I absolutely love this part of the film-making process as sound effects and music really bring animations to life. I have a huge library of sound effects and music that I have compiled over the years.
We used Adobe Premiere Pro to add sound effects. We had fun using Audacity to record and change the pitch of voices.
You too can enjoy a selection of my sound effects and a guide on using Audacity in my on-demand courses.
Software, equipment & Table-Top Studios
The software used to make these animations is Dragonframe. It is the industry standard for stop motion animation software. I have been using at my workshops every since I set up StopMoGo in 2010. It has an inuitive interface and has a wealth of features to assist you as you animate.
I have included a comprehensive set-up guide with full information on which camera and lights I use at my workshops in my on-demand courses.
I have also included instructions on how to make a portable table-top studio with special features based on my original design. Find out more here.
These are the films that won the Ray Harryhausen Award for Best Children’s Animation 2024:
Honourable Mention
I also directed and co-created a film that received an honourable mention in the 2024 Awards.
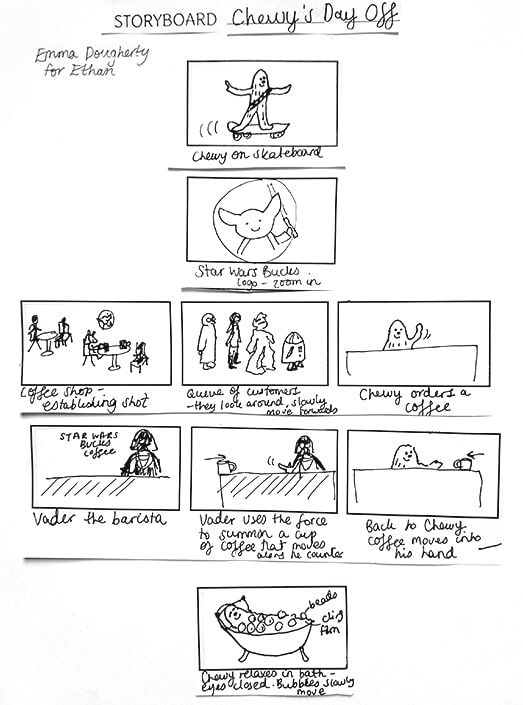
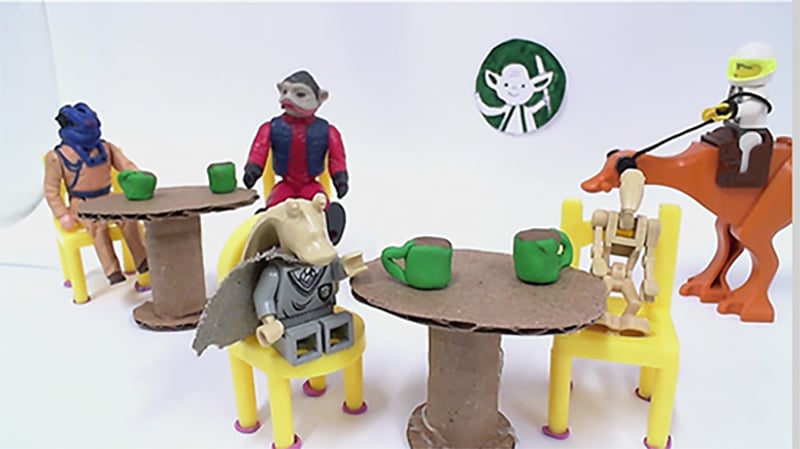
It was a surprise bespoke birthday workshop for a young animator in my Edinburgh studio. I created the concept, storyboard, puppets, props, sets, replacements, sound – all on the theme of his favourite film. I loved creating ‘Chewy’s Day Off’, including a visit to StarWarsBucks, with Vader as the barista, using the Force to serve customers, then having a nice bubble bath at the end of the day.
Ethan was very surprised and delighted as you can imagine, and did very well on the day trying all of the different animations.